Tuesday, October 31, 2017

It Is Time To Start Thinking Christmas!

Hi Everyone! Are you starting to think it is time to get ready for the holidays? How about using some of your Craft Fantastic goodies as you make some presents? I am going to show you one idea today using some of our Jewelers Glass, Glaze & Glue, Image Sheets and Bling.

Here is what I started with! I have two of the same Holiday All Jewelers Glass Sheets, Glaze & Glue, Clear Mini Round Glass Bling,  Dew Drop Pendant Kit (You will only be using the glass on this project). Additional supplies used are a wooden box from the local craft store and paper to cover the box.
I am giving you basic directions for this project. There are so many different ways you can go with it. I first trimmed the paper to fit the top of the box and adhered my paper to the box with Glaze & Glue. Next I selected Images fromthe selected Image Sheets and used my Glaze & Glue to adhere the images to the Dew Drop Shaped Jewelers Glass and trimmed as usual. Before I adhered the petals and the bling to the box I did use a stencil and Glitter paste to add a bit of detail and sparkle to the cover. I then used my Glaze & Glue and adhered the Jewelers Glass and the Bling. I then also added a few sequins also using Glaze & Glue. And here you can see the finished product. You can really take this project in many different directions, whether you use different papers, fabric, lace, ribbon, paint, and you can really go crazy with tons of details.
Give it a try! I would love to see what you come up with! And if you have any questions at all please just ask in the comments section and I will be happy to help you!

I hope you all like this project!

Hugs,

Judy

Saturday, October 28, 2017

Let's Talk About Craft Fantastic Glass Part 3

Hello everyone!!  Kymona from Kreative Kymona here today and let's talk about the different shapes of Craft Fantastic Glass!

Welcome back to part 3 of this series!!  I'm going to show you two different shapes of glass and their trays. 

Let's Take a Look:


Not allow does Craft Fantastic have circle or square glasses and trays, they also have glasses and trays in different shapes that are amazing. 

The Dew Drop Pendant and the Apple Pendant glasses are some of my favorite glasses the store sells.  I love how they look and can be paired with any image.


They come in both Antique Brass and Silver! They would make perfect gifts to give to anyone.


Take a Closer Look:


These glasses comes in a kit and aren't sold separately.  You can find the Dew Drop Pendant Kit here and the Apple Pendent Kit here.

What do you think?  

Aren't these different shape glass pieces from Craft Fantastic amazing.  Let me know how you feel really about Craft Fantastic Glasses now!!

Where to find us:

Just in case you didn't know you can find Craft Fantastic on all of the social media platforms:


Follow so that you don't miss out on any of the creative ideas, deals and new goodies that appear in the store.

Thank you so much for stopping by!!

Thursday, October 26, 2017

Let's Talk About Craft Fantastic Glass Part 2

Hello everyone!!  Kymona from Kreative Kymona here today and let's talk about Craft Fantastic Glass and what we can do with it besides making jewelry!!

Welcome back to part 2 of this series!!  I'm going to show you different ways to use craft fantastic glass.

Let's Take a Look at all the Projects:


1. Creating a magnet by adding a thin sheet of magnet behind it.


Cut a small piece of Deflecto Craft Magnetic Sheet and adhered it to the back of the designed glass.


2. Attach the glass to add a focal point to a handmade card.


Create a clean and simple card by adding score lines to the right side and bottom of the card to create texture and draw your eye to the sentiment glass piece.

3. Create an envelope closer with Tombow Velcro Tabs.


Decorate the small glass piece.  Adhere the glass piece to envelope flap.  Attach a piece of velcro under the flap for closure.


Nice card set to send to someone you love.


4. Create a mini board game of Tic Tac Toe.


Decide which design you want behind the Mini Glass pieces.  Remember to choose two different designs. Create 6 glass pieces for each design.  On the small wood slice, draw two line horizontally and two lines vertically.  Using Cricut Vinyl, add the title of the game to the backside of the wood slice.

What do you think?  

Aren't these fun ways to use the amazing glass pieces from Craft Fantastic.  Let me know how you feel about Craft Fantastic Glasses now!!

Where to find us:


Just in case you didn't know you can find Craft Fantastic on all of the social media platforms:


Follow so that you don't miss out on any of the creative ideas, deals and new goodies that appear in the store.


Thank you so much for stopping by!!

Tuesday, October 24, 2017

HALLOWEEN SUPRISE ATC (ARTIST TRADING CARD) SWAP

I love making ATC's (artist trading cards).  I have been swapping for over 20 years with groups all over the world.  This swap was Halloween themed  and so I looked through all my craft stash and found some fun collage sheets. The two recipients of this swap will get the ATC and a pendant. 


The CRAFT FANTASTICS PRODUCTS USED FOR MY PROJECT ARE:

CRAFT FANTASTIC SUPER STICKY DOTS
CRAFT FANTASTIC GLAZE AND GLUE
30" ROLO CHAIN SILVER AND ANTIQUE BRASS
X LARGE GLASS ROUNDS
X LARGE ROUND PENDANT TRAY SILVER AND ANTIQUE BRASS


This is also a great illustration to show that CRAFT FANTASTIC products can be used to make photos into pendants.


The ATC's are always trading card size, 2 1/2 x 3 1/2.  I hope my trade partners love their HALLOWEEN SUPRISE!
Liz from Junque Drawer Designs

Tuesday, October 17, 2017

...On A Pumpkin?...Really!

Yep! It is that time of year for decorating pumpkins, and I thought, hey, I wonder...would Fantastic Glaze & Glue work on a pumpkin? So I thought I would give it a try!
 
Here is what I started with...and yes that is a real pumpkin, some fun Halloween pieces from Michaels and of course Fantastic Glaze & Glue and the new larger Mini Rounds Glass Bling!


So I started first with the eyes. Now when I purchased these googly eyes i didn't realize it was one piece, and as I bought the pumpkin seperately, these eyes could possibly have been a bit smaller. So when I used the Fantastic Glaze & Glue on them and they are a bit thick and not rounded in any way I used masking tape to hold them in place while the glue dries. It does take a bit of time for this to dry and I am not a patient person.

Ok, next came the nose and mouth so I decided to use the large bling. I just put the Fantastic Glaze & Glue on then positioned the bling on for the nose and mouth, and again, definitely give a bit of dry time. And then for that shredded paper fun stuff I just put more of the Fantastic Glaze & Glue on the top and added the "hair". I then used some more Fantastic Glaze & Glue on top of the hair and added a purple fabric hair bow!
 
And here you have my finished pumpkin! What do you think?

As always I would love to hear what you think of this project and if you have questions always ask!
 
Hugs,
 
Judy

Saturday, October 14, 2017

Let's Talk About Craft Fantastic Glass - Part 1

Hello everyone!!  Kymona from Kreative Kymona here today and let's talk about Craft Fantastic Glass!!

Craft Fantastic glasses are the most important part of the jewelry making process for me.  The trays are nothing without the glass for the most part, LOL!!!

I love to prepare multiply glasses a head of time for last minute gifts, projects and for my own jewelry wearing reasons.  

Take a look:


Easy and ready to go.  The only thing I have to decided once my glasses are done is which tray goes well with the image.  

These are fun to make and you can use them for other things besides necklaces or bracelets.

Here is a list of things you can do with these decorated trays:

1. Create a magnet by adding a thin sheet of magnet behind it. 

2. Attach them to a card or scrapbook page to spell out a sentiment or simply for the image.

3.  An envelope closure by adding velcro to the back.

4. Create a mini board game of Tic Tac Toe.

To Be Continued....

I will demonstrate all of these ideas for my post next week (Part 2) so come on back to see these ideas in action.


So what do you think? Did any of these ideas cross your mind?  If not, you will be amazed next week when you see them in action.   Let me know how you feel about Craft Fantastic Glasses!!

Where to find us:


Just in case you didn't know you can find Craft Fantastic on all of the social media platforms:


Follow so that you don't miss out on any of the creative ideas, deals and new goodies that appear in the store.


Thank you so much for stopping by!!

Tuesday, October 10, 2017

Dia de los Muertos/Day of the Dead

More incredible images from Craft Fantastic!! DAY OF THE DEAD medium squares and circles,small ovals,hearts.


Once I chose the images I adhered the jeweler's glass to the cut out images  using CRAFT FANTASTIC GLAZE AND GLUE..I then picked out some trays to place the glass into.  I chose the MEDIUM SQUARE TRAY SILVER AND A SMALL OVAL ROPE RING ANTIQUE SILVER. 


The Day of the Dead in 2017 begins on October 31 and ends on November 2.  It is a Mexican festival celebrated to pray for lost loved ones and help them on their journey into the afterlife.  The sugar skull tradition can be traced back to Europe and the skulls would bear the names of those who had passed away.


Saturday, October 7, 2017

Breast Cancer Awareness Necklaces


Hello everyone!! Kymona from Kreative Kymona here today with a couple of special necklaces to share with you.

October is National Breast Cancer Awareness Month and I wanted to create a couple of necklaces to show my support.

Let's Take a Look:


One of my crafty friends recently lost a family member to breast cancer and I wanted to do something and what I thought I could do is raise awareness for others.

The Breast Cancer Awareness image was pulled from the Internet. I thought it was perfect for these Silver Puffy Square Pendant Necklaces that comes in a kit. The Believe Necklace was created with the Silver Scroll Square Tray and the Watercolor Inspiration images.

I have a coworker at work that participates in the Making Strides Against Breast Cancer Walk each year. I will give these necklaces to her. One for her to wear all month long, so that everyone will know her dedication to the cause, the other Breast Cancer Awareness necklaces to her biggest supporter and the Believe necklace to a Breast Cancer Survivor that she knows. The best thing we can do is: GET TESTED EARLY!! Early detection can save lives.

I know this will make her day.

Facts About Breast Cancer:


Here are some facts about Breast Cancer in The United States from the National Breast Cancer Foundation, INC:

  • One in eight women in the United States will be diagnosed with breast cancer in her lifetime.
  • Breast cancer is the most commonly diagnosed cancer in women.
  • Breast cancer is the second leading cause of cancer death among women.
  • Each year it is estimated that over 252,710 women in the United States will be diagnosed with breast cancer and more than 40,500 will die.
  • Although breast cancer in men is rare, an estimated 2,470 men will be diagnosed with breast cancer and approximately 460 will die each year.
  • On average, every 2 minutes a woman is diagnosed with breast cancer and 1 woman will die of breast cancer every 13 minutes.
  • Over 3.3 million breast cancer survivors are alive in the United States today. 

The best thing we can do is: GET TESTED EARLY!! Early detection can save lives.

Breast Cancer Screenings:


Here are some screening guidelines according to the American Cancer Society:

These guidelines are for women at average risk for breast cancer. A woman at average risk doesn’t have a personal history of breast cancer, a strong family history of breast cancer, or a genetic mutation known to increase risk of breast cancer (such as BRCA), and has not had chest radiation therapy before the age of 30.

  • Women between 40 and 44 have the option to start screening with a mammogram every year.
  • Women 45 to 54 should get mammograms every year.
  • Women 55 and older can switch to a mammogram every other year, or they can choose to continue yearly mammograms. Screening should continue as long as a woman is in good health and is expected to live 10 more years or longer.
  • All women should understand what to expect when getting a mammogram for breast cancer screening – what the test can and cannot do.
For those who are of higher than average risk please click here.

I hope today's post has bought about some additional awareness for everyone.

Where to find us:


Just in case you didn't know you can find Craft Fantastic on all of the social media platforms:


Follow so that you don't miss out on any of the creative ideas, deals and new goodies that appear in the store.


Thank you so much for stopping by!!

Tuesday, October 3, 2017

October Kit Assembly Instructions

Introducing the NEW October Kit-of-the-Month

This kit features two NEW Thanksgiving-themed Art Image Sheets, the addition of Modular Trays, and an exclusive set of small Leaf Charms! Fall has officially arrived and well represented in this set! 

Let's put these fabulous pieces together...

Assembly Instructions

Thanks for ordering the Craft Fantastic OCTOBER KIT! This kit is available for a limited time. 
Click HERE to order yours today!  

Here's a few links to help you complete the projects followed by a few 
assembly instructions for each piece:


This necklace is a bit more involved than previous projects. I've laid out the steps in the clearest manner possible, but there are certainly more ways than one to assemble this piece. 
  1. Select an image and add it to the glass cabochon using Fantastic Glaze & Glue.  
  2. Remove the Lobster Clasp and small jump rings from the end of the 24" Rolo Chain. Set them aside to be added later in step #13.
  3. Using a pair of old scissors or wire cutters, remove a piece of chain 15 links in length from each end of the Rolo Chain. At the end of this process, you should have 2 pieces of chain 15 links in length and one long piece of chain. We're going to build this piece from the bottom up.
  4. Attach the Large Oval Pendant Tray to the large jump ring. Close the jump ring using pliers. Attach the small Leaf Charm to the large jump ring using a small jump ring.
  5. Attach the two pieces of chain that are 15 links in length to the large jump ring using small jump rings. 
  6. Lay your piece out on a flat surface. Attach a Branch Connector to the end of each of the short chains using a small jump ring. The Branch Connectors have a back and a front so be sure to attach them so that the front of the connector is face up and the curve of each connector is facing inward. This will ensure that the piece lays flatter when worn. Lay the piece out on a flat surface after each new addition. This will give you an idea of whether adjustments need to be made as you continue to assemble. 
  7. Attach an Ellipse Loop to each Branch Connector using a small jump ring. The Ellipse Loops have a slight concave shape to them when laid flat. Be sure to attach them so that the concave arch of the Ellipse Loop is towards the back. 
  8. Attach a Branch Connector to each Ellipse Loop using a small jump ring and follow the same instructions as outlined in step #6.
  9. Attach one end of the longer, remaining piece of rolo chain to the top loop of each Branch Connector using a small jump ring.
  10. At this point, you have the choice to make your piece any desired length you like. I chose to shorten it so that the chain including the Branch Connectors and Ellipse Loops (but NOT including the large jump ring and the Large Oval Pendant Tray) measure just under 26" in total. I felt that the piece laid best when worn at this length.
  11. To shorten the chain to a length of just under 26" like I did, lay the necklace completely out on a flat work surface. Find the very back center of the piece of the Rolo Chain. That is the point furthest away from the Large Oval Pendant Tray when stretched taut. Cut that very back center piece with a pair of old scissors or wire cutters
  12. Cut a piece approximately 4" in length off of each end using a pair of scissors or wire cutters.
  13. Re-attach the Lobster Clasp and Jump Rings that you sat aside in step #2.
  14. Add two Fantastic Sticky Dots to the tray. Remove the red backing to expose the adhesive. 
  15. Firmly press the appropriate cabochon into the tray. 


  1. Select an image and add it to the glass cabochons using Fantastic Glaze & Glue.   
  2. Remove the Lobster Clasp and small jump ring from the ends of the 30" Rolo Chain.
  3. Attach the Flower Toggle loop piece to one end of the Rolo Chain and the Flower Toggle bar piece to the other end using small jump rings. 
  4. Using pliers, bend back the top loop and the opposite bottom loop of the Large Round Modular Tray.
  5. Using pliers, bend back the top loop of the Small Round Modular Tray. 
  6. Attach the top loop of the Large Round Modular Tray to the loop piece of the Flower Toggle using a Pinch Bail.
  7. Attach the top loop of the Small Round Modular Tray to the bottom loop of the Large Round Modular Tray using a small jump ring.
  8. Attach the small Leaf Charm to the jump ring between the Small Round Modular Tray and the Large Round Modular Tray using another small jump ring.
  9. Add two Fantastic Sticky Dots to the Large Round Modular Tray and one Fantastic Sticky Dot to the Small Round Modular Tray. Remove the red backing to expose the adhesive. 
  10. Firmly press the appropriate cabochon into the trays. 
  11. Press the remaining loops on the Modular Trays around the glass using a bone folder.


  1. Select images and add them to the glass cabochon using Fantastic Glaze & Glue. 
  2. Using pliers, remove the Lobster clasp and decorative ball from the ends of the Charm Bracelet. 
  3. Attach the Flower Toggle loop piece to one end of the Charm Bracelet using a small jump ring. Attach the Flower Toggle bar piece to the opposite end, also using a small jump ring.
  4. Attach the Small Square Charm Tray and the small Leaf Charm to the Charm Bracelet using small jump rings. 
  5. Add a Fantastic Sticky Dot to the tray. Remove the red backing to expose the adhesive. 
  6. Firmly press the appropriate cabochon into the tray. 


  1. Select images and add them to the glass cabochons using Fantastic Glaze & Glue. 
  2. Using pliers, bend back the top loop on each of the Tiny Round Modular Trays.
  3. Attach a French Ear Wire to the top loop of each Branch Connector. 
  4. Attach a Tiny Round Modular Tray to the bottom of each Branch Connector using a small jump ring. 
  5. Cut a Fantastic Sticky Dot into quarters and press a quarter piece into each tray. Remove the red backing to expose the adhesive.
  6. Firmly press the appropriate cabochon into each tray.
  7. Press the remaining loops on the Modular Trays around the glass using a bone folder.


  1. Select images and add them to the glass cabochons using Fantastic Glaze & Glue. 
  2. Using pliers to bend back the top loop and the opposite bottom loop on each of the Mini Round Modular Trays.
  3. Attach a Long Ear Wire to the top loop of each Mini Round Modular Tray. 
  4. Attach a small Leaf Charm to the bottom loop of each tray using a small jump ring.
  5. Add a Fantastic Sticky Dot to each tray. Remove the red backing to expose the adhesive.
  6. Firmly press the appropriate cabochon into each tray.
  7. Press the remaining loops on the Modular Trays around the glass using a bone folder.
We hope you LOVE the OCTOBER Kit-of-the-Month! Be sure to follow Craft Fantasic on FACEBOOK and INSTAGRAM! Also, sign up for the CRAFT FANTASTIC NEWSLETTER for the latest and greatest sales, giveaways and product peeks! 

See you soon with more crafty stuff!

Glaze And Glue-The Sequel! And A Denver Visit!

Hi All! Today I am going to share with you a bit more about Glaze and Glue and show you another way to use it with your Craft Fantastic Products. But First!!!!

Have you had a chance to see us at one of the many shows we do throughout the year? I had a chance to do a quickie road trip and get to say hello to our road warriors! These ladies do an amazing job and they are definitely worth the trip! If we are in your area, or even kinda, sorta, close, come out and say hi!
 
 
And now for that Glaze and Glue continuation...
 
I have been a huge fan of Glaze and Glue for many years and I really do use it for many things. One example of that is that I have used it on paper crafting which I have shown you before on cards, but I have also used it for some intricate papercrafting as well. Here is a little something that would not have been possible without it.
 
 
All that delicate die cut paper on the front was glued to the wood shadowbox with Glaze and Glue and it holds better than anything else I have found.

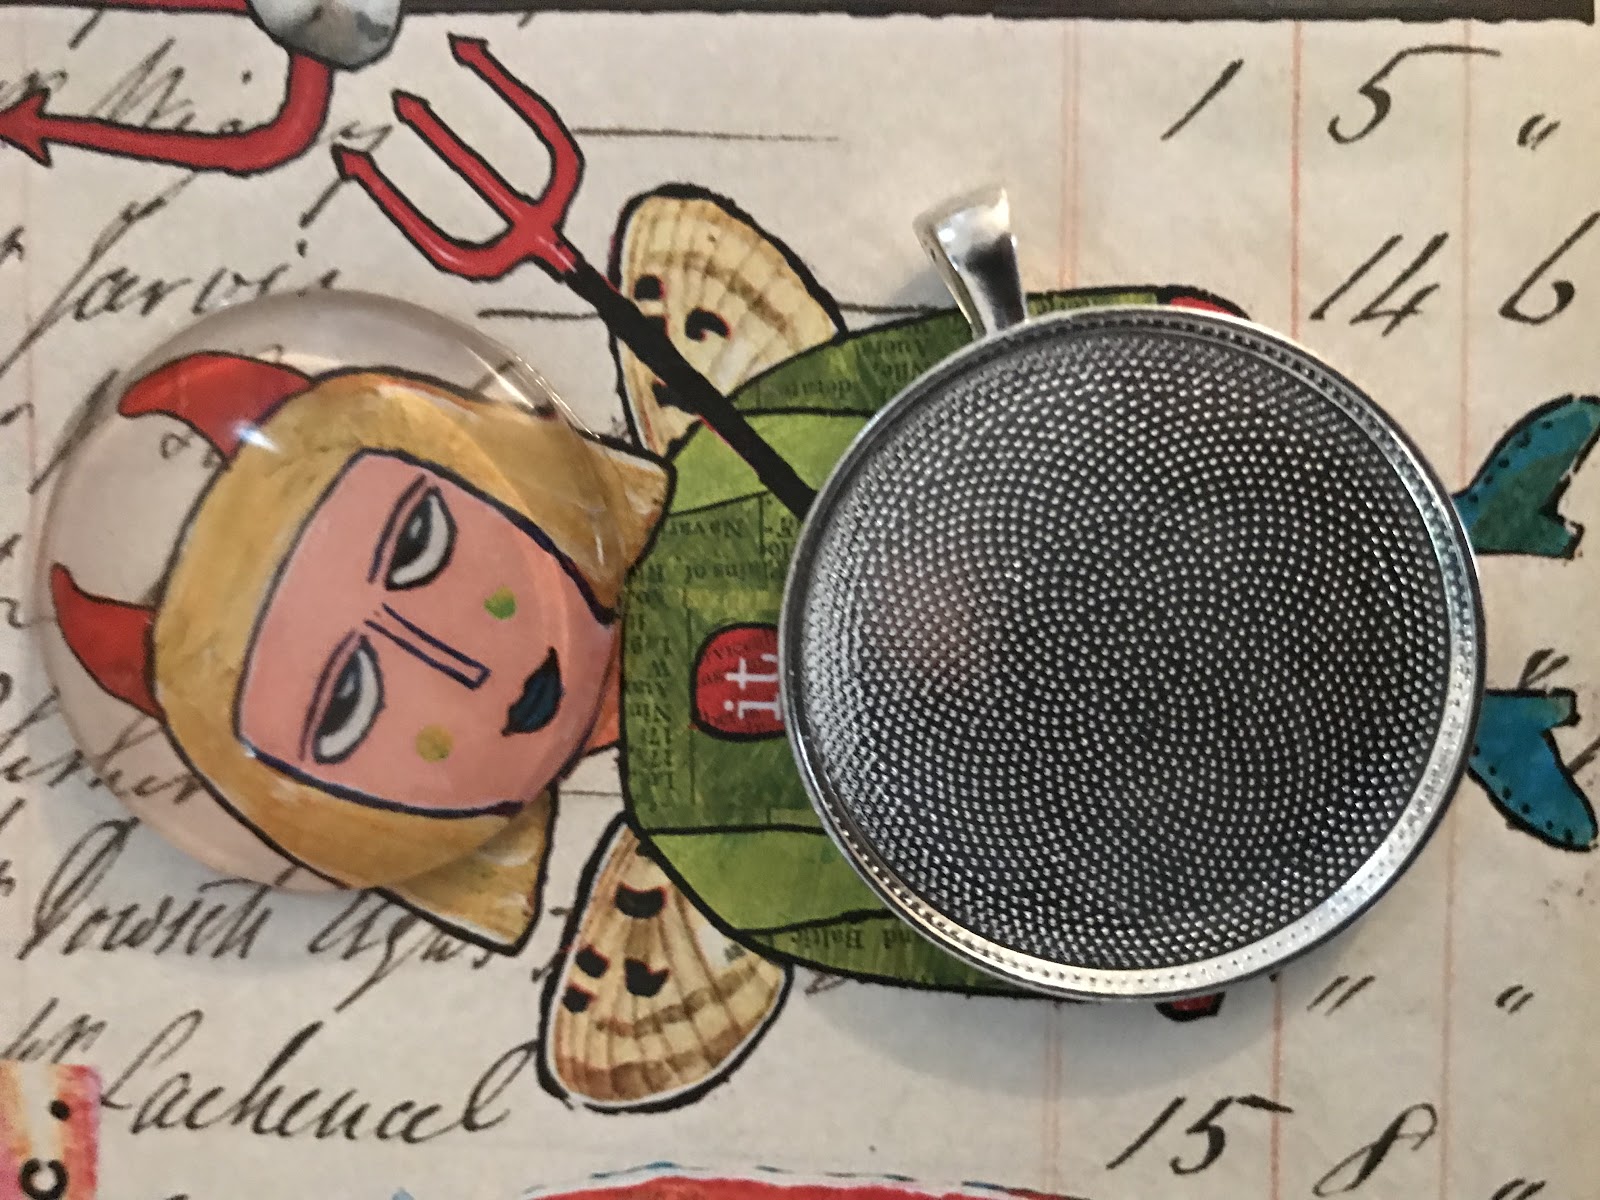
But wait, theres more...for this I was curious. I am totally in love with our bling, and I had an idea. So I took our large round pendant tray and put a puddle of Glaze and Glue directly into the tray.


I then took one of our new larger bling pieces and put it in the center of the tray and filled in around the center with seed beads. I did use my finger to push the seed beads into the glue ( a tool of some sort would probably been better than my finger but I am a crafter) and let this set for a while, probably close to an hour.


It dried rock solid! Now, bear in mind I was experimenting so I will tell you that my finished piece is not as perfect as I would have liked. I actually used a little too much glue. It would probably have been better to use less and add as I went, even layering the glue a bit. I think the edges would have been cleaner around the center bling. Also you could change out the colors of seed beads if you go slower and do more layering.  But...it worked!


Try it and play! I would love to see what you come up with!

Did you find this imformation helpful? Do you have questions for us? Do you have followup questions on this information? Please feel free to leave questions and comments below and I will be happy to answer them for you!
 
Hugs,
 
Judy